8 minutes
Written: 2020-10-27 01:05 +0000
Updated: 2020-11-22 17:15 +0000
Anki Decks with Orgmode
This post is part of the Orgmode Almanac series.
Setting up unicode math and
orgmodefor painless Anki deck building
Background
A recent Hacker News post reminded me of Anki, and that brought back memories of
my Anki orgmode setup. I thought I’d re-create and immortalize it.
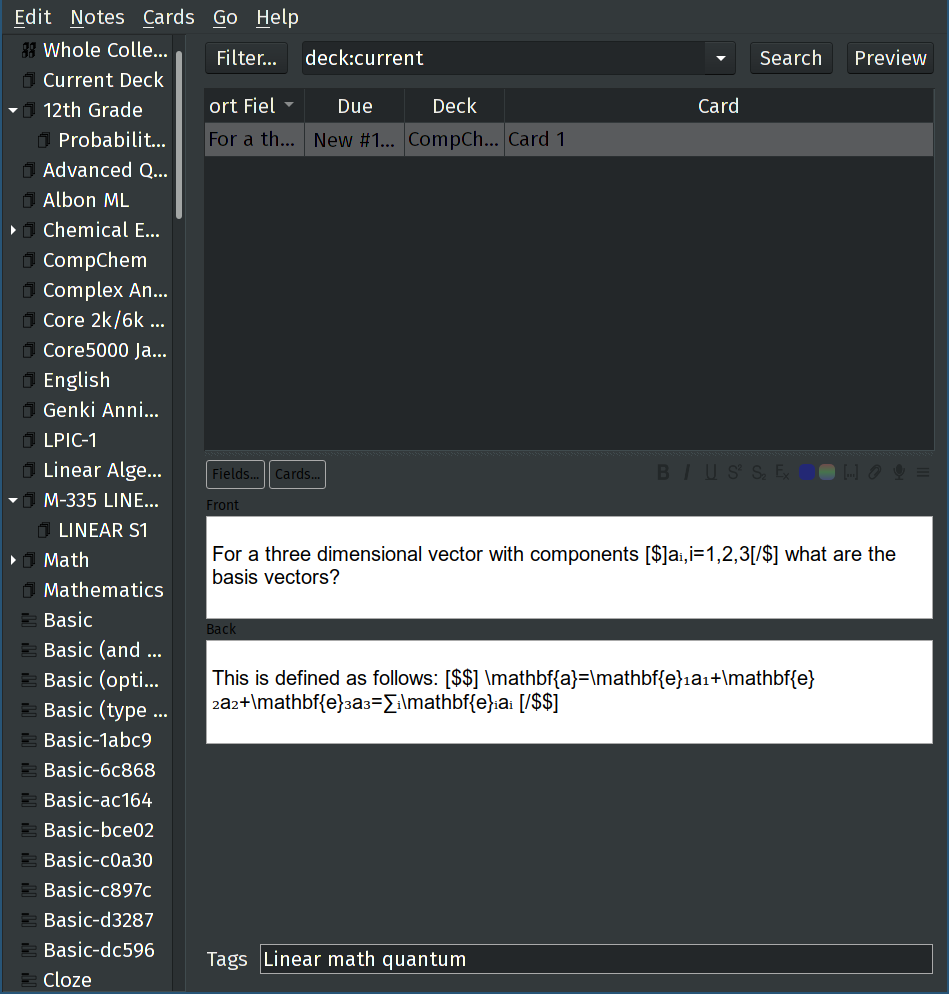
The standard way of working with Anki, is with a pretty awkward GUI. There are changes to be made here, which make life a little easier, including the setup of custom cards, but the inherent concerns of the WYSIWYG editor are basically insurmountable.

Figure 1: Anki GUI
The goal is to get this a better workflow than manual editing of Anki decks.
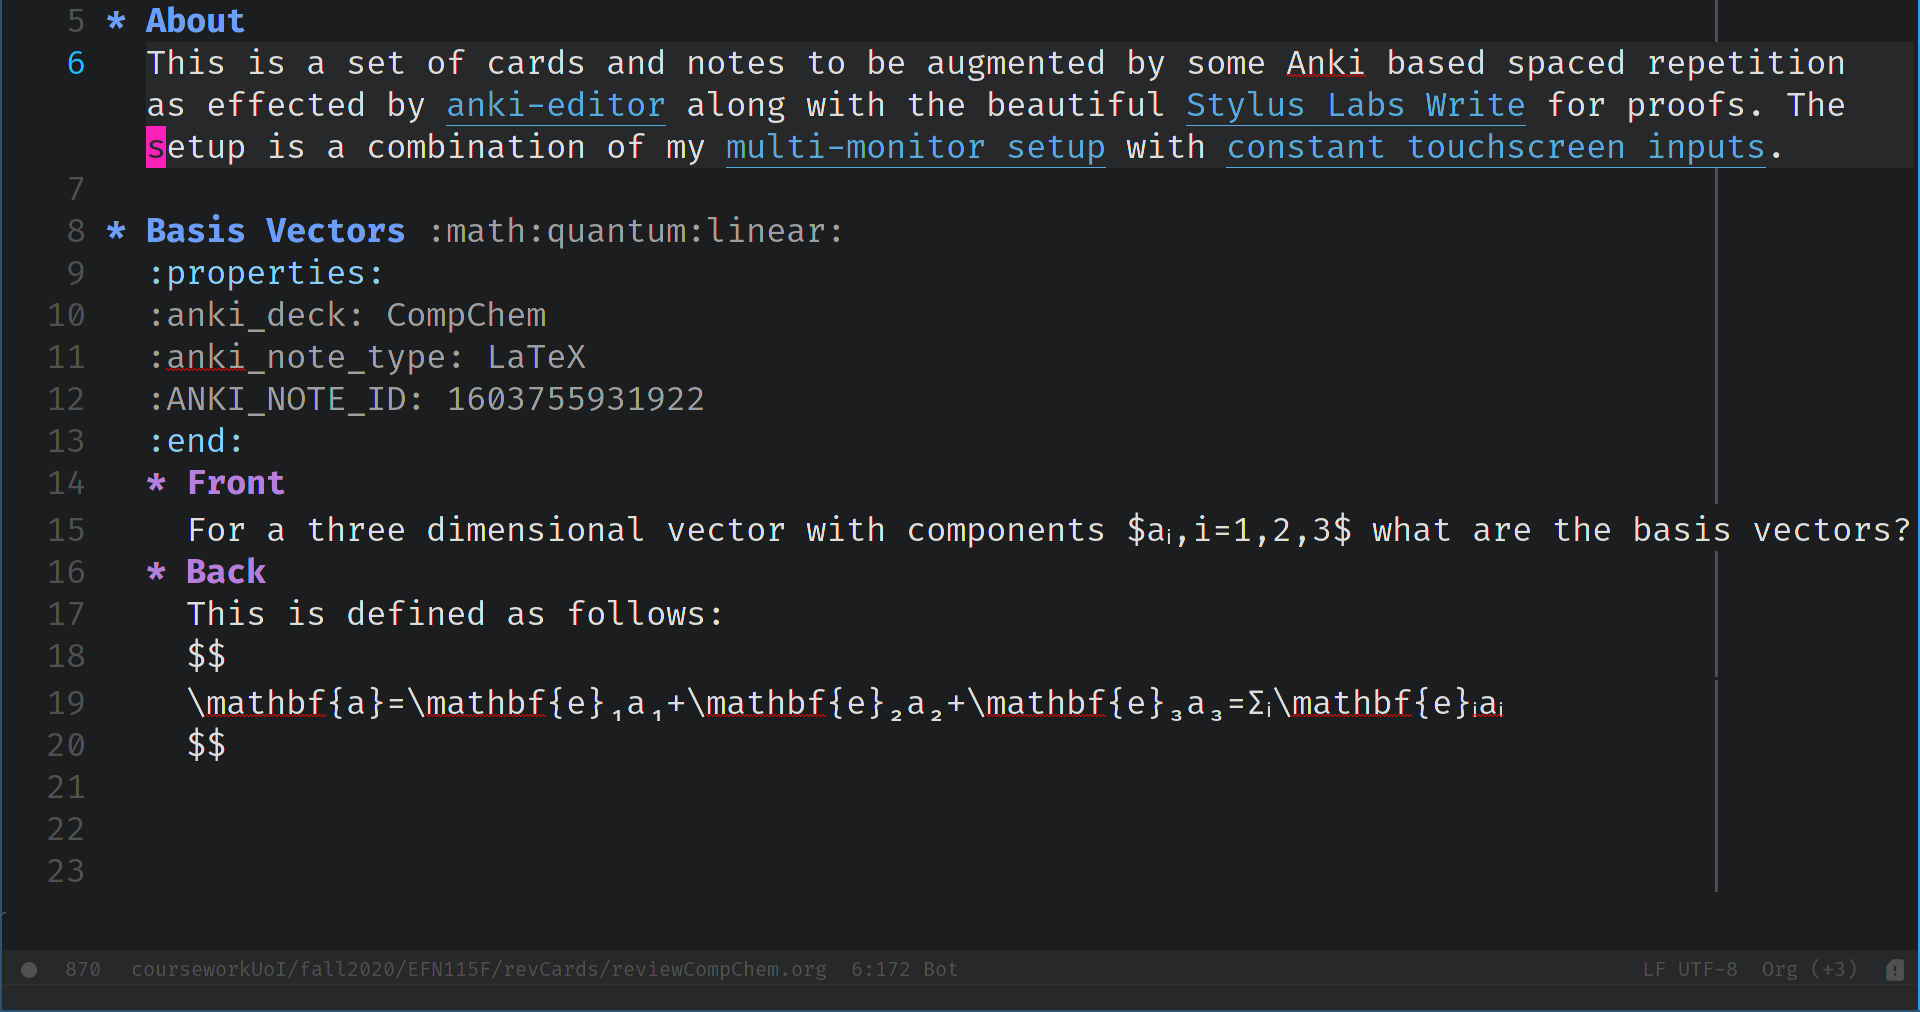
orgmode is perfect for making cards, especially in the larger context of using
it for storing images and rich pdfs.

Figure 2: A pleasant way to make anki decks
Methodology
To accomplish this, we basically need to have the following:
- anki-editor
- This
emacsplugin will facilitate the conversion from ourorgmodefiles to the Anki markup - anki-connect
- We need a server of sorts set up to allow us to push pull and get errors from the running Anki server, this is an Anki plugin
- LaTeX process editor
- It wouldn’t be much better than manually making cards in Anki if we couldn’t leverage
unicodecharacters, so we need to modify the internal Anki build process for TeX
Anki Editor
As with all emacs related setup snippets on this site, these should be modified and adapted as needed, especially for those not using doom-emacs.
1(use-package anki-editor
2  :after org-noter
3  :config
4  ; I like making decks
5  (setq anki-editor-create-decks 't))
Also, my full configuration has additional non-essential quality of life keybindings amongst other things.
Anki Connect
CTRL+Shift+A will bring up the addon settings, and Anki has to be restarted after installing the addons. Anki Connect itself does not need any further configuration, though the readme is very comprehensive.
TeX Setup
The LaTeX process editor can be set in two stages, wherein we will first ensure that we can use xelatex and that we can generate an svg.
 1{
 2    "svgCommands": [
 3        [
 4            "xelatex",
 5            "--no-pdf",
 6            "-interaction=nonstopmode",
 7            "tmp.tex"
 8        ],
 9        [
10            "dvisvgm",
11            "--no-fonts",
12            "-Z",
13            "2",
14            "tmp.xdv",
15            "-o",
16            "tmp.svg"
17        ]
18    ]
19}
The png settings can be modified in a similar manner if required, but it is better to generate svg files, which will set up in the cosmetics section. Note that we pass --no-pdf to get the xdv file which has replaced dvi files for xelatex.
Cosmetics
The final aspect of this is to be configured with the GUI. The easiest option is to clone the Basic card type and customize that. CTRL+Shift+N should bring up the card editor. The relevant styles are1 (from the Cards option):
 1.card {
 2 font-family: Literata;
 3 font-size: 26px;
 4 text-align: center;
 5 color: black;
 6 background-color: white;
 7}
 8img {
 9max-height:1000px;
10height: auto;
11width: auto;
12}
13img[src*="latex"] {
14  vertical-align: middle;
15}
Now we need setup our TeX headers as well, and enable the Create scalable images with dvisvgm option. The header needs to have (minimally):
1\documentclass[12pt]{article}
2\special{papersize=3in,5in}
3\usepackage{geometry}
4\usepackage{unicode-math}
5\usepackage{mathtools}
6\pagestyle{empty}
7\setlength{\parindent}{0in}
8\begin{document}
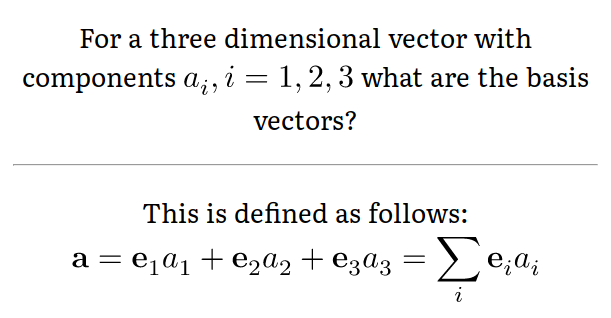
While the footer is simply \end{document}. With this, we have achieved
pretty formatting.

Figure 3: Pretty card formatting
Font Locking
Inspired by this post, we will also use orgcss to obtain some orgmode font-locking. We will add the following styles:
  1:not(pre) > code {
  2  padding: 2px 5px;
  3  margin: auto 1px;
  4  border: 1px solid #ddd;
  5  border-radius: 3px;
  6  background-clip: padding-box;
  7  color: #333;
  8  font-size: $code-size;
  9}
 10
 11.org-src-container {
 12  border: 1px solid #ccc;
 13  box-shadow: 3px 3px 3px #eee;
 14  font-family: $monospace;
 15  font-size: $code-size;
 16  margin: 1em auto;
 17  padding: 0.1em 0.5em;
 18  position: relative;
 19}
 20
 21.org-src-container > pre {
 22  overflow: auto;
 23}
 24
 25.org-src-container > pre:before {
 26  display: block;
 27  position: absolute;
 28  background-color: #b3b3b3;
 29  top: 0;
 30  right: 0;
 31  padding: 0 0.5em;
 32  border-bottom-left-radius: 8px;
 33  border: 0;
 34  color: white;
 35  font-size: $code-size;
 36}
 37
 38/* from http://demo.thi.ng/org-spec/ */
 39
 40.org-src-container > pre.src-sh:before {
 41  content: "sh";
 42}
 43.org-src-container > pre.src-bash:before {
 44  content: "bash";
 45}
 46.org-src-container > pre.src-emacs-lisp:before {
 47  content: "Emacs Lisp";
 48}
 49.org-src-container > pre.src-R:before {
 50  content: "R";
 51}
 52.org-src-container > pre.src-org:before {
 53  content: "Org";
 54}
 55.org-src-container > pre.src-cpp:before {
 56  content: "C++";
 57}
 58.org-src-container > pre.src-c:before {
 59  content: "C";
 60}
 61.org-src-container > pre.src-html:before {
 62  content: "HTML";
 63}
 64.org-src-container > pre.src-js:before {
 65  content: "Javascript";
 66}
 67.org-src-container > pre.src-javascript:before {
 68  content: "Javascript";
 69}
 70
 71// More languages from http://orgmode.org/worg/org-contrib/babel/languages.html
 72
 73.org-src-container > pre.src-abc:before {
 74  content: "ABC";
 75}
 76.org-src-container > pre.src-asymptote:before {
 77  content: "Asymptote";
 78}
 79.org-src-container > pre.src-awk:before {
 80  content: "Awk";
 81}
 82.org-src-container > pre.src-C:before {
 83  content: "C";
 84}
 85.org-src-container > pre.src-calc:before {
 86  content: "Calc";
 87}
 88.org-src-container > pre.src-clojure:before {
 89  content: "Clojure";
 90}
 91.org-src-container > pre.src-comint:before {
 92  content: "comint";
 93}
 94.org-src-container > pre.src-css:before {
 95  content: "CSS";
 96}
 97.org-src-container > pre.src-D:before {
 98  content: "D";
 99}
100.org-src-container > pre.src-ditaa:before {
101  content: "Ditaa";
102}
103.org-src-container > pre.src-dot:before {
104  content: "Dot";
105}
106.org-src-container > pre.src-ebnf:before {
107  content: "ebnf";
108}
109.org-src-container > pre.src-forth:before {
110  content: "Forth";
111}
112.org-src-container > pre.src-F90:before {
113  content: "Fortran";
114}
115.org-src-container > pre.src-gnuplot:before {
116  content: "Gnuplot";
117}
118.org-src-container > pre.src-haskell:before {
119  content: "Haskell";
120}
121.org-src-container > pre.src-io:before {
122  content: "Io";
123}
124.org-src-container > pre.src-java:before {
125  content: "Java";
126}
127.org-src-container > pre.src-latex:before {
128  content: "LaTeX";
129}
130.org-src-container > pre.src-ledger:before {
131  content: "Ledger";
132}
133.org-src-container > pre.src-ly:before {
134  content: "Lilypond";
135}
136.org-src-container > pre.src-lisp:before {
137  content: "Lisp";
138}
139.org-src-container > pre.src-makefile:before {
140  content: "Make";
141}
142.org-src-container > pre.src-matlab:before {
143  content: "Matlab";
144}
145.org-src-container > pre.src-max:before {
146  content: "Maxima";
147}
148.org-src-container > pre.src-mscgen:before {
149  content: "Mscgen";
150}
151.org-src-container > pre.src-Caml:before {
152  content: "Objective";
153}
154.org-src-container > pre.src-octave:before {
155  content: "Octave";
156}
157.org-src-container > pre.src-org:before {
158  content: "Org";
159}
160.org-src-container > pre.src-perl:before {
161  content: "Perl";
162}
163.org-src-container > pre.src-picolisp:before {
164  content: "Picolisp";
165}
166.org-src-container > pre.src-plantuml:before {
167  content: "PlantUML";
168}
169.org-src-container > pre.src-python:before {
170  content: "Python";
171}
172.org-src-container > pre.src-ruby:before {
173  content: "Ruby";
174}
175.org-src-container > pre.src-sass:before {
176  content: "Sass";
177}
178.org-src-container > pre.src-scala:before {
179  content: "Scala";
180}
181.org-src-container > pre.src-scheme:before {
182  content: "Scheme";
183}
184.org-src-container > pre.src-screen:before {
185  content: "Screen";
186}
187.org-src-container > pre.src-sed:before {
188  content: "Sed";
189}
190.org-src-container > pre.src-shell:before {
191  content: "shell";
192}
193.org-src-container > pre.src-shen:before {
194  content: "Shen";
195}
196.org-src-container > pre.src-sql:before {
197  content: "SQL";
198}
199.org-src-container > pre.src-sqlite:before {
200  content: "SQLite";
201}
202.org-src-container > pre.src-stan:before {
203  content: "Stan";
204}
205.org-src-container > pre.src-vala:before {
206  content: "Vala";
207}
208.org-src-container > pre.src-axiom:before {
209  content: "Axiom";
210}
211.org-src-container > pre.src-browser:before {
212  content: "HTML";
213}
214.org-src-container > pre.src-cypher:before {
215  content: "Neo4j";
216}
217.org-src-container > pre.src-elixir:before {
218  content: "Elixir";
219}
220.org-src-container > pre.src-request:before {
221  content: "http";
222}
223.org-src-container > pre.src-ipython:before {
224  content: "iPython";
225}
226.org-src-container > pre.src-kotlin:before {
227  content: "Kotlin";
228}
229.org-src-container > pre.src-Flavored Erlang lfe:before {
230  content: "Lisp";
231}
232.org-src-container > pre.src-mongo:before {
233  content: "MongoDB";
234}
235.org-src-container > pre.src-prolog:before {
236  content: "Prolog";
237}
238.org-src-container > pre.src-rec:before {
239  content: "rec";
240}
241.org-src-container > pre.src-ML sml:before {
242  content: "Standard";
243}
244.org-src-container > pre.src-Translate translate:before {
245  content: "Google";
246}
247.org-src-container > pre.src-typescript:before {
248  content: "Typescript";
249}
250.org-src-container > pre.src-rust:before {
251  content: "Rust";
252}
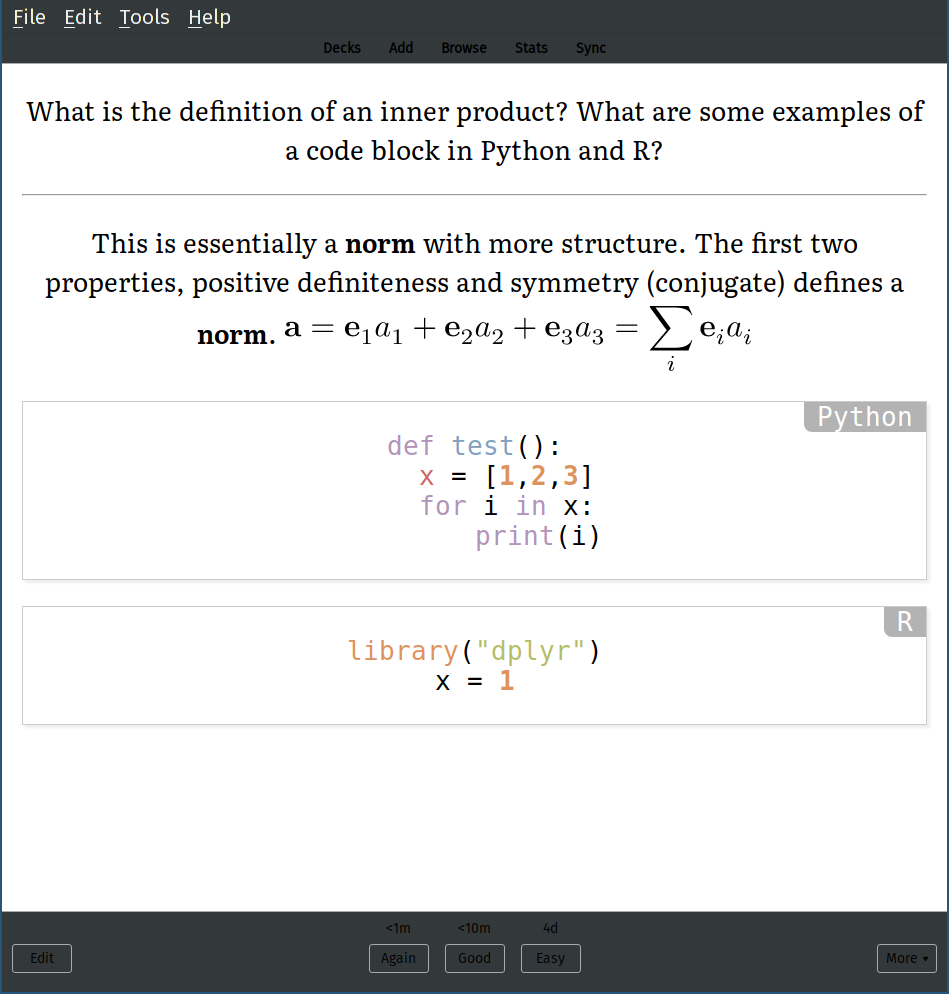
However, in the interests of sanity, we will leverage the Syntax Highlighting Anki plugin for managing the actual style-sheets instead of manual edits to each card type.

Figure 4: A screencast from the plugin readme
At this stage, we have a card which can gracefully handle both XeLaTeX and code in an elegant manner. An example is presented in the next section.
Usage
For the sample card2 shown, the markup is dead simple.
 1* Basis Vectors :math:quantum:linear:
 2:properties:
 3:anki_deck: CompChem
 4:anki_note_type: LaTeX
 5:ANKI_NOTE_ID: 1603755931922
 6:end:
 7** Front
 8For a three dimensional vector with components $aᵢ,i=1,2,3$ what are the basis vectors?
 9** Back
10This is defined as follows:
11$$
12\mathbf{a}=\mathbf{e}₁a₁+\mathbf{e}₂a₂+\mathbf{e}₃a₃=∑ᵢ\mathbf{e}ᵢaᵢ
13$$
Essentially:
- Enable and load
anki-editor- Add local variable section to ensure we load
anki-editor. This is essentially viaeval: (anki-editor-mode)in the Local variables block
- Add local variable section to ensure we load
- Fire up Anki
- Export at will, and continue adding more cards or non-card details to the
orgmodefile
The Anki editor examples file is excellent and the issue tracker also has a ton of information.
Code
 1* Test Code :code:python:
 2:properties:
 3:anki_deck: CodeWiki
 4:anki_note_type: myTex
 5:ANKI_NOTE_ID: 1603891864091
 6:end:
 7** Front
 8What is the definition of an inner product? What are some examples of a code block in Python and R?
 9** Back
10This is essentially a *norm* with more structure. The first two properties, positive definiteness and symmetry (conjugate) defines a *norm*.
11$$
12\mathbf{a}=\mathbf{e}₁a₁+\mathbf{e}₂a₂+\mathbf{e}₃a₃=∑ᵢ\mathbf{e}ᵢaᵢ
13$$
14
15#+begin_src python
16def test():
17    x = [1,2,3]
18    for i in x:
19        print(i)
20#+end_src
21
22#+begin_src R
23library("dplyr")
24x = 1
25#+end_src

Figure 5: Code card with TeX
More Content
- Fundamental Haskell
- An excellent example of how a multiple frontend learning repository can be, written with
org-drill3 - Anki powerups with orgmode
- A post brought to my attention after I had published this, an excellent introduction with videos
Conclusions
Some final comments:
- Screenshots and other images linked are automatically synced
- The TeX is best rendered on the PC first, so run through these at-least once
A missing link in this setup is the ability to use a touch screen and stylus to
write proofs or skip the TeX setup altogether, but that would require another
post altogether. Additionally, all the standard bells and whistles of having an
orgmode document can be applied, including, crucially, the ability to have
long-form notes as well, a coherent approach to this can also be covered later.
Series info
Orgmode Almanac series
- Replacing Jupyter with Orgmode
- Using Mathematica with Orgmode
- Pandoc to Orgmode with Babel
- An Orgmode Note Workflow
- Temporary LaTeX Documents with Orgmode
- Anki Decks with Orgmode <-- You are here!

